Showing posts with label tree. Show all posts

Tuesday, October 19, 2010

Gather Ye Pinecones

For the third instalment of Start Now and Be Ready for Christmas, I've got some pinecones for you. There's something just lovely about bringing nature into the home at Christmas, and pinecones are relatively easy to find -- most craft shops sell them by the sack-load. But perhaps these ideas will inspire you to start early, and have time to collect your own this year.

1. Pinecone Wreath
A lovely alternative to greenery, I'm sure this wreath would be quick work, with a variety of collected pinecones and acorns, a circular foam base and a lot of hot glue.


2. Pinecone Centrepiece
Old candlestick-holders, pinecones, and a glittery star or two, and you've got a little Christmas sparkle for the table. I love that the pinecones are so compact, so if your Christmas feast consists of dozens of dishes, they will squeeze in nicely between the turkey platter and the brussel sprouts.


3. Pinecone Gift-Wrap
If your family is competitive each year about who can wrap the fanciest presents, then perhaps a pinecone and pretty ribbon will finally put you in the lead?


4. Pinecone Garland
Simple, natural, beautiful. I could imagine this garland in a cosy Christmas log cabin, or in a sleek Scandinavian apartment.


5. Pinecone Christmas Cake
Martha Stewart design, of course. And though you can't eat the pinecones, the pine-needles are made of chocolate!


6. Pinecone Tree
And if you hit the jackpot and find a mountain of pinecones, why not make your whole Christmas tree out of them! Just be careful if your dog is anything like Bella... or else Christmas morning might be a carnage of chewed cones!

(Start Now and Be Ready for Christmas is inspired by a series over at The Fable of the Table)

Wednesday, October 13, 2010

A Christmas Forest

Continuing in the Start Now and Be Ready for Christmas series, today I've got a tutorial for you on making Dr. Seuss-esque Christmas trees. Start now, and you could have a whole forest ready by December!


There are tons of books out there on repurposing old woollen sweaters, or recycling T-shirts. But where are all the books about what to do with grotty men's polo shirts in dismal colours that have shrunk and faded? If, like me, that's what you've got an excess of lying around, then grab your scissors! (If not, then really any green fabric will work: felt, cotton, fleece, old shirts, old scarves, old tablecloths...)

Sorry, Justin, this one has been kidnapped from your cupboard:


What you'll need:
  • 2 scraps of green fabric, one at least 10" square, the other at least 4" square
  • stuffing
  • buttons
  • green and red embroidery thread
  • a pompom

Start by cutting a pizza-slice-shaped triangle out of the green fabric. Mine were about 10" in length down each side, with a 45 degree angle at the point. Smaller angles make thinner trees, larger angles make squatter, fatter trees.


Fold the triangle in half, lengthwise, with right sides together. Pin the sides together.


If the bottom corners don't quite match up, trim along the bottom edge so that they are even.


Stitch along the long side, where the two edges meet, from the point to the bottom edge using running stitch.


Turn the tree inside out, and place on top of the second scrap of fabric (wrong side up). Draw a circle around the base of the tree using a fabric pen, giving yourself about 1/2" of extra space.


Cut out the circle.


Pin the circle (right side down) to the base...


...leaving about a third unpinned, so that you can stuff the tree.


Fill with stuffing. I like to use a knitting needle to get stuffing all the way to the tip, which will help hold up the pompom. A bit of squidging every now and then should get rid of any lumps and bumps.


Once stuffed, pin the last third of the base in place, closing up the gap.


Blanket stitch all around the base of the tree, joining the two pieces together. (Not familiar with blanket stitch? Tutorial here)


And finally, decorate your tree! I like the look of pompoms on top, but a bell, felt star, or favourite ornament could work well, too. You could go with all-white buttons, and use colourful thread to sew them on, or use coloured buttons. If you've got children (or husbands) eager to get involved, perhaps let them pick out the decorations for a tree!


Even Pumpkin is getting in the holiday spirit!


I hope a few more dull shirts out there will get rescued from the backs of cupboards and reinvented as little festive forests. And, if you're looking for another Christmas craft idea to get you ready for the holidays, there's a brilliant Felt Christmas Card tutorial over at The Fable of the Table today... enjoy!

Friday, December 18, 2009

Jingle Bella


So well-behaved, Bella hasn't eaten any of our tree decorations. See how she's sitting so neatly, toes pointed, by the tree? The camera definitely brings out her best behaviour.

Friday, September 4, 2009

Off the Needles

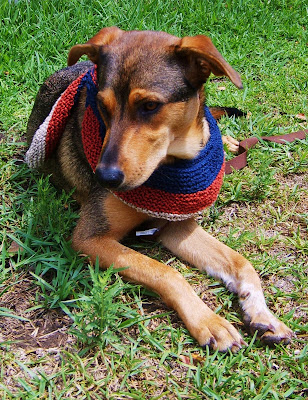
My vertical stripy scarf is now off the needles... and onto the dog!
What a little fox.
She wouldn't go outside this morning because it was raining, so I might just have to make her a little raincoat and some rain boots as well!

It's just the perfect length for me, or for a fencepost.

And much softer than bark...
Can you tell that I like living somewhere where there's trees and grass and doggies and backyards? :)