Showing posts with label baby. Show all posts

Monday, June 11, 2012

{in progress: 'on the tube' baby quilt}

Sometimes, inspiration hits so hard that there's nothing to do but give in, right away, dropping everything else and running with it. 

That's how I felt when I saw this Tokyo Subway quilt by Elizabeth Hartman of Oh, Fransson!. She provides full instructions for making the quilt, including just how many thousands of squares to cut... 

 (image source: Oh, Fransson!)

...but I loved the idea of designing my own snaking, bendy train lines. I also loved the idea of scaling it all down a bit, and making a baby/toddler-sized quilt instead. Oh, and I like to imagine these are London Underground trains instead (so please 'mind the gap' between some of the blocks).

The idea was to slowly but surely cut out the 500 squares I needed over the next few months, a few each evening, leaving plenty of time to sew it together before our December due date. However, it was all just a bit too exciting, and one manic night of cutting led to four manic days of sewing, and within a week the whole top was done.


So much for slowly but surely... but then again I do have an awful habit of just making quilt tops and never backing or binding them, so at least there's a good few months left to get all that (boring) stuff done. Until then, Tilly is putting the top to good use, driving her Brio trains up and down the tracks and stopping at each 'squirrel crossing' square (made out of a pair of Justin's old boxers) to avoid any casualties.

Monday, June 4, 2012

{annual summer knitting}

Every year, as it gets hot, I'm overcome by the illogical impulse to knit a thick and woolly blanket. In 2010, it was a little faded pink, basket-weave project for Tilly. Last year, it was a gigantic patchwork throw for my sister, Alice, to take to university. And this year, I bring you the grey stripes -- a baby blanket for our forthcoming little winter elf.


Though the knitting is now all finished -- happily, it worked out that I could cosy up with it while in chilly England this May -- all those stripes means a few dozen ends to weave in. And end-weaving-in is top of my list of unexciting projects. But hopefully by December, it'll be ready to wrap around a new little person... you know, if Texas temperatures ever decide to drop down to blanket-wearing weather!

Tuesday, October 25, 2011

{confessions of tillyless tuesdays}

I was just going to show you the sweet little baby head with its sweet little baby mullet and the progress on tilly tuesdays: volume II, but then I decided I should tell you the truth. The truth is, I haven't consciously taken a photo of Tilly on a Tuesday for sixteen weeks. There have been plenty of photos, and there have been the usual amount of Tuesdays, but if they've occurred together, it's been purely by chance.

If you remember, tilly tuesdays: volume one was a handmade book of photographs, taken each Tuesday of Tilly's first year. Ah, younger Astrid, and her need for perfection. Once, late on a Tuesday evening, she did the unthinkable -- the most taboo act of motherhood -- she woke a baby just for an authentic Tuesday photo. (Yes, I can hear your collective gasp, echoing around the world... don't worry, I've learnt my lesson.)


But earlier today, wanting to read an email without being asked to see "beh-bee? beh-bee?" (and then screamed at when the email had no baby in it), I pulled down volume one. Fifty-two weeks of beh-bee, in handy sit-on-the-floor format. Peace. And then I realised --  today is Tuesday, and I hadn't yet taken a photo. I didn't take a photo last Tuesday, the Tuesday before, or any of the fourteen great-great-grand-Tuesdays that came before that.


Luckily, present-day Astrid cares very much less about perfection. "Ah, close enough," was my mantra of the afternoon photo sorting, along with "If I tell myself enough that the dates are accurate, I won't know the difference." Sorry, future Astrid, it doesn't sound like I've got much faith in your memory. At least I've labelled the book for you so you'll know which child is in the photos. You're welcome.

Okay, enough words. You're here for the photos, I know.


While the first volume was full of milestones like Tilly smiling or eating food for the first time, this year the firsts are of a rather different nature. Two months ago: the first time she sailed around a miniature version of the world in a Lego boat. A month ago: the first time she picked up a ladybird. A week ago: the first time she really played with a friend, rather than just trying to hit him on the head with toys (sorry, Ewan). 

And that is why I have to keep it up -- so that all these photos don't fade into the jumble of "when she was little," but get to tell their stories and take their place in this weekly history of a person. Well, that, and I love the thought of teenage Tilly going to the photobooth each week to take her picture, twenty-year-old Tilly taking blurry self-portraits on a 'vintage' iPhone, eighty-year-old Tilly sleeping in a room full of filing cabinets (a la Bill Cunningham) filled totally with Tuesday photos... 

...let's see, 80 years x 52 weeks = 4160 photos. Okay, she'd probably just have them on a CD. 

Tuesday, October 18, 2011

{let me eat cake}

One year old seems like ancient history now -- the frantic machining of Ruffle Fest 2011, the last minute erecting of The World's Simplest DIY Photobooth, and the whirlwind of a Cheese themed party. Really, it was only three months ago. Long enough, though, that I swooned with nostalgia when I saw Little Starling's first birthday photo shoot, using a strand of Red Red bunting (from my shop).
What a perfect little red chair! Our good old IKEA high chair is shaking its plastic tray in envy. And, for even more good ideas for birthday photography, you can see more photos from her shoot, including chubby little baby legs covered in cake, here

Friday, July 22, 2011

{hello world, it's me, tilly}

Tilly's gone global. Find her sharing tips and tricks from her "Say Cheese" birthday party today over at the brilliant Ohdeedoh (the children's section of Apartment Therapy).


Or, if you've had enough cheddar, cameras and birthday party pics to last you a lifetime, why not check out these other inspired ideas:

Tuesday, June 21, 2011

{matchy matchy}

Inspired by all the memory games I showed you the other day, I made this little animal matching game for Tilly. It's sort of cheating -- rather than make the whole thing myself, I simply made a board to go with a Clothkits Noah's Ark that I used to play with as a child.

What a relief to not have to make new animals! And it's sort of lovely to turn one toy into two toys. 

Maybe you've got a similar set of animals that could double as game pieces? Or, it could be fun to use household objects and have more of a scavenger hunt game -- make a game board that has spots for a fork, a hairbrush, a banana, the TV remote!


To make it was simply a case of drawing around each animal onto fabric (I used fabrics that roughly matched the colour of the animal, to make matching a little easier), cutting them out and sewing them onto a square of white linen.

Then, to increase the future educational value, I added freezer-paper-stenciled animal names.


Here's the board:


And here it is with all the animals in place:


Yes, there was quite a discussion about how to say 'zebra'. We're going to have one poor little confused baby when it comes to the letter 'z'.


The sheep seems to be Tilly's favourite. I wonder if all those grey fluff lines remind her of the sheepskin she can't sleep without.


The crocodile is Bella's favourite -- I always seem to be pulling him out from her jaws. Luckily, tooth marks only seem to give him more character.


Tilly was very excited by the whole thing...

...for a few seconds. And then off she went to tip over the furniture, empty cupboards, and rip magazines apart. 

How lovely that putting the game away is as simple as loading the animals back onto the ark.


I've got a feeling this'll be perfect if we ever have forty days of rain.

Thursday, June 9, 2011

{off the charts}

A few weeks ago, I showed you Emily's beautiful growth chart, and ever since, I've been cutting, sewing and quilting my fabric scraps together to come up with something similar for Matilda.


For someone who doesn't really put initials on stuff, I've sure been embroidering my fair share of 'm's onto things this week. I guess I can't get enough of the American Typewriter font.


I made a couple of changes from Emily's design. Some by accident (such as getting carried away piecing the parts together and realising too late that I had one big strip instead of six neat little strips) and some on purpose (such as adding in embroidered lines to mark Tilly's exact height). 

Actually, not so on purpose -- the addition of lines was to cover up my inexact sewing. Each little square is supposed to be an inch high, so that you can simply count the squares to measure your child. My squares ranged from 0.8 inches to 1.2 inches. Not a big deal for one square, but when you put them together, it sort of throws the whole measuring thing off. Which is, you know, the point of a growth chart. Oops. Hence, embroidered lines.


I skipped out on adding the exact date we measured her, too, simply because I can't say for sure that I could find that information. Yes, I could find your 5000 photos of her first year for you in milliseconds, but dates and weights and numbers? Um, no. We're doing ball-park ages. Approximation never hurt anyone.


I think I'd mentioned the idea of having significant fabrics match up with special ages. Well, the piecing process made the fabric order completely random, so I gave up on that.

But how excited was I to find that at 21", her length at birth, their was a little scrap of an Alexander Henry tiger? Very! (Tilly was born  in the year of the tiger, and has absolutely lived up to all of the fiery, roaring expectations)


Other fabrics of significance include: the Russian Doll lining to Tilly's Moses basket, the red gingham of her first dress, the red wagon wheel print of the pajamas I lived in for the first three months of her life, and of course, her party dress fabric.


Rather than using a wooden dowel, our growth chart is supported by this handy little ruler, inserted between the pockets on the back. It's got a perfect hole in the middle for hanging, and it'll be handy for measuring up from the last mark to see how tall Tilly is. Rulers on the brain at the moment, it seems.


Still a long way to grow. And if she continues getting taller at this rate, as Justin says, she'll be 70 feet tall by the time she's sixteen. I'm going to need more scraps...

Friday, June 3, 2011

{to top it off}

In my search for ideas for birthday crowns, I came across these beauties. Each one seems so full of personality -- just like the birthday boys and girls, I'm sure. 

This fabric crown, by Cupcakes for Clara, was made for another little Matilda! The flowery prints are lovely, and I really like the font of the embroidered 'm'. Typewriter meets thread -- I love it.


This felt crown, by Floating World, has that great border around the bottom. I've got a bit of Russian Doll twill tape that might do the same job perfectly. Plus, I love any excuse to practice the chain stitch my Mum taught me last Christmas!


And this sweet little crown by Chasing Cheerios is a lovely way to show the age -- with a single candle on the cupcake. And it would be very simple, the next year, to stitch on a second candle to continue the tradition.


Tilly's crown was inspired by all three -- a felt section in the middle, but with fabric sides (which, incidentally, match her party dress, so this year she'll be a super coordinated little birthday girl).


I usually stay away from using initials, because I can never decide whether to use an 'M' for Matilda or a 'T' for Tilly. But I loved the other Matilda's crown so much, I couldn't resist adding a letter, and a typewriter's 'm' looks much better than a 't' in the same font. So, it was decided -- she'll be Matilda for birthdays.


Tilly tried it on, just a minute ago, so I could check it fits, and was so excited to wear it. Usually, when I put any sort of hat on her, she grabs madly at her head until the offending article until either it comes loose or until it gets stuck over her eyes and I take pity on her, but amazingly the crown was left untouched! Let's see if she can leave it in place when it comes time for birthday photos...

Monday, May 16, 2011

{tilly tuesdays: volume one}

Every Tuesday for forty-eight weeks, each week since she was born, I've been taking a portrait of Tilly.
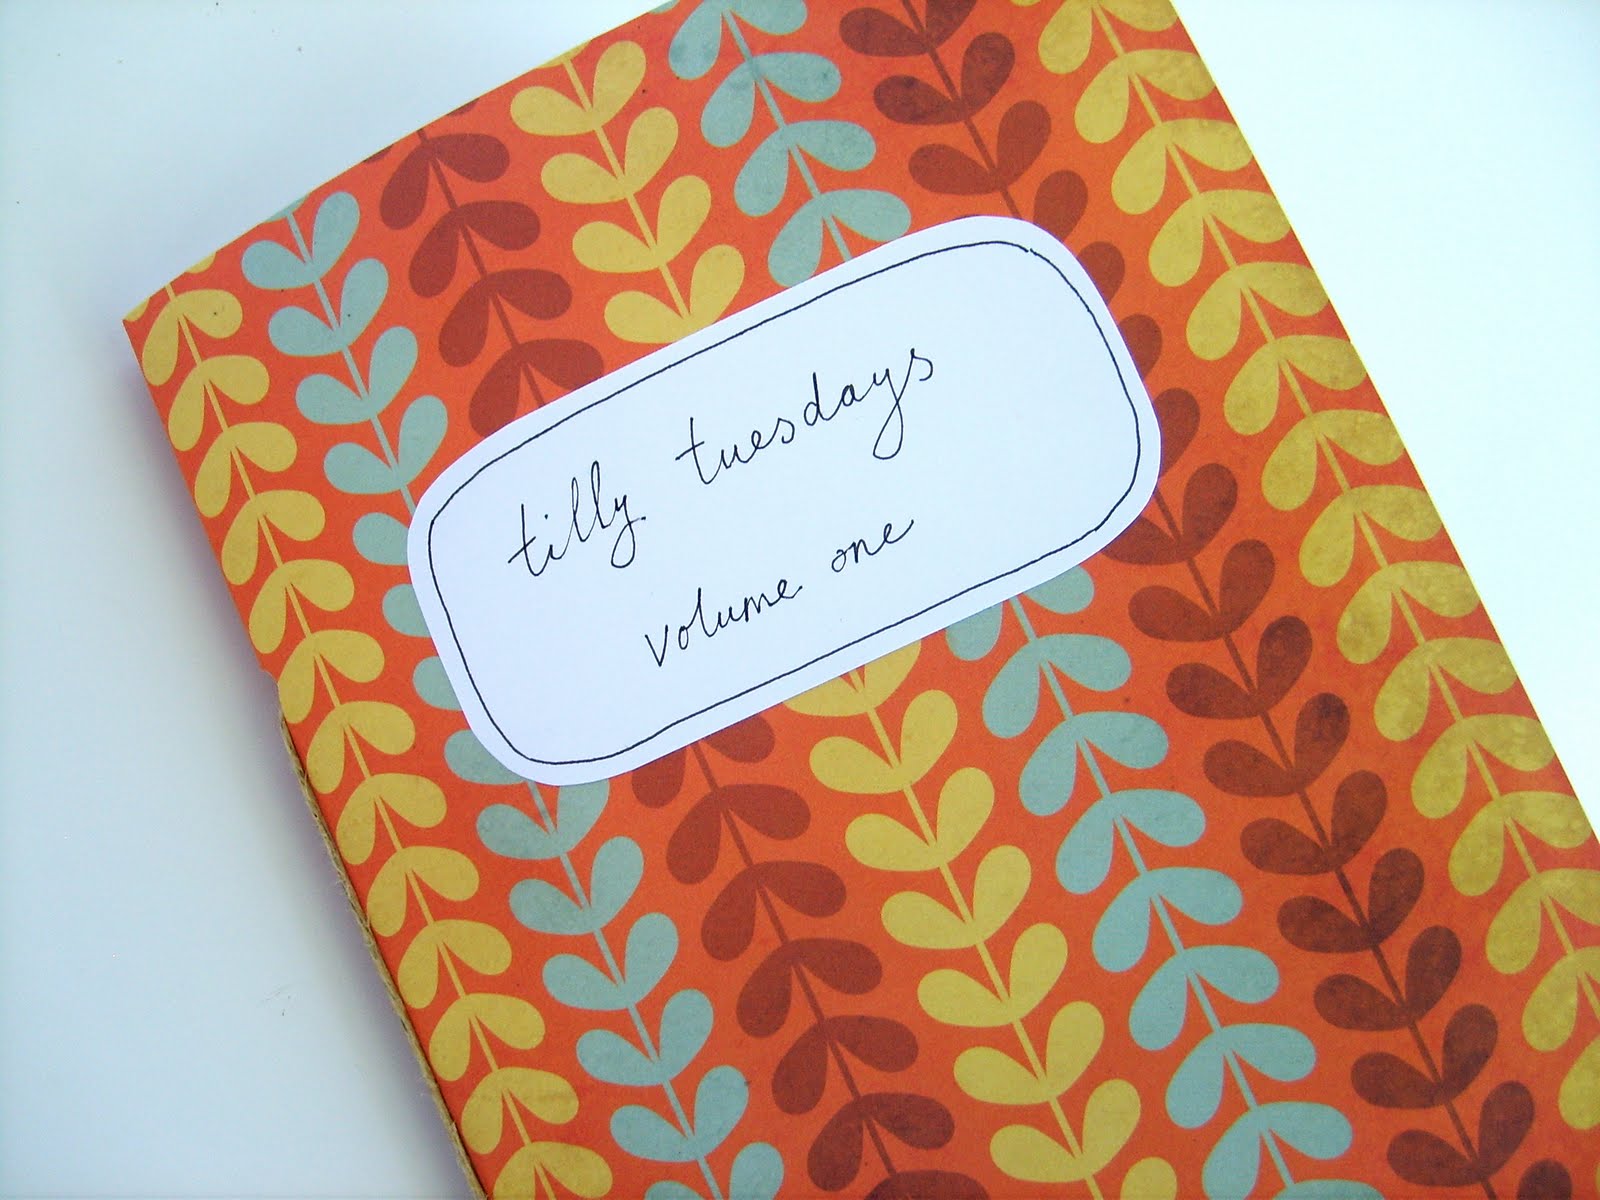

And creating a little handmade book for this year of Tuesdays couldn't have been easier. (So easy, I couldn't possibly bore you with photos of the process -- i.e. blank paper. Instead, you get a peek at Tilly's book of Tuesdays!)

Materials: 13 sheets of white cardstock, a sheet of patterned scrapbook paper, 52 photographs, a glue stick (or however you like to stick in photographs), a hole punch, string and a black pen.

Isn't it the best feeling when you already own all the supplies?


Each sheet of cardstock was simply folded in half, and then punched with the hole punch about 3" from each edge.


The pages were numbered by week, the photos were glued in on the centre of each page (and cropped slightly if they happened to be landscape).


The finished pages were stacked together and placed on top of the sheet of scrapbook paper. I drew around the pages, creating a cover which was about 1/4" wider than the card on every side, and then cut out the cover. Using the holes in the card as a guide, I marked where to make holes in the cover, and then punched them both.


String was threaded through the holes, starting outside the cover and going through to the middle, then up to the top hole and through back to the outside. I put the string through twice, and tied a knot so that it sat in the middle of the book. (But outside, on the spine, would work, too)


At the bottom of some pages, I marked special things that happened that day. For example, on week thirty-six, Tilly tried her first IKEA meatball. A major milestone in our family.


It's been a great way to see how she's changed over the year, and a wonderful way to display those "everyday" photos -- the ones that aren't always astounding quality (ahem, iPhone effects), aren't always of special events, aren't particularly memorable moments, but sum up daily life at that age.


The one thing that many of the photos have in common is Tilly's expression -- an expression I now recognise as a concentrated, determined effort to get her hands on the camera!


Yes, I'll need to work on getting a few more smiles in the future!


Today, Tuesday, is forty-eight weeks. What a shock it was to see a mere four blank pages left in this year!

Monday, May 9, 2011

{birthday envelopes}

It's birthday season around here! To hold the cards, I sewed up a couple of felt envelopes for Tilly's friends, and figured while I was at it, I'd tick another project off the first birthday list for Tilly. 

Similar to the Valentine's envelope, this version is a little more baby friendly, with a Velcro fastening for easy access. Want to make one yourself? Or, a whole set for your little postman? Here's how:


Materials: 

7" x 12" piece of felt in your choice of colour
Small scraps of felt in other colours (for the stamp)
Embroidery thread
5" length of sew-on Velcro

You can choose whether to hand-sew or machine your envelope. I hand-stitched the name and stamp, and machined the edges, but it would work just as well all hand-sewn or all-machined (if you are confident with free-motion sewing).


Cut your felt to 7" by 12". This is the perfect size for holding a notecard (A6, I believe). Cut triangles from two of the corners, along a shorter edge, (1 1/2" along the sides).


Fold your envelope so that the bottom edge (without snipped corners) reaches to the lower corner of the triangle along the top edge (the bottom of the 'flap'). This is the shape your final envelope will be. Place pins along the fold, and along the bottom of the flap. You should only pin through the top layer of felt, not all the way through.

This will mark the space for the front of your envelope, and show you where to sew on the name and stamp. Unfold the envelope and sew on a name in the middle, using backstitch or chain stitch (as above), or your machine if you're cleverer than me!


Assemble your stamp. Cut a 1" x 1 1/2" rectangle for the base, either using pinking shears or simply scalloping the edges with your scissors. From contrasting colours, cut a 3/4" x 1 1/4" rectangle to go on top of the base, and an emblem of some sort for the middle.


As these will be given on birthdays, I added the babies' ages (one) on my stamps, and a heart for Tilly's (as she'll be using the same one again next year!)


Stitch the second rectangle to the top layer of felt, in the upper right-hand corner of the front of your envelope. There is no need to stitch the base, as the second rectangle will hold it in place.


Stitch on your number, heart, initial, or whatever emblem you've picked.


Now, for the fastener. Cut a 5" length from both the hook and the loop tape. Pin the hook side to the backside of your envelope, 1/4" from the top edge.


Now, refold your envelope (bringing the bottom edge up) and fold the top flap down to see where it meets the back of the envelope. Pin the loop tape in that spot.


Sew both pieces of Velcro in place.


Pin the edges of the envelope together.


Sew along the bottom edge of the flap, just above the top of the backside of the envelope. Do NOT sew the back to the front!

Continue sewing round the other three sides of the envelope, sewing front and back together.


Your envelope should look like this! All ready to fill with birthday cards, and to be used by little postmen for years to come.


What a colourful day at the post-office! And, unlike regular envelopes, it should stand up to a bit of chewing...