Showing posts with label quilt. Show all posts

Wednesday, February 25, 2015

Tea and Scones: A Quilt Tutorial

 photo DSC_0366.jpg

I remember, clearly, the first time I touched Liberty fabric.

My Mum and I were sitting at her big farmhouse table in her kitchen in Suffolk, planning the quilts we were going to make that summer together. I had brought some cotton prints over in my suitcase for us to use, and Mum disappeared upstairs and came down with a little cardboard box, in which a dozen or so carefully-folded Liberty fabrics sat. "Do you think these would go, too?" she asked, setting them between us, and I remember that exact feeling of holding a square of the light and shimmery material with amazement and disbelief that anyone would allow me to use such beautiful fabrics.

Allowing myself to actually sew with my favourite fabrics -- such an important part of letting the joy in the creative process shine through -- began that summer, with the little cardboard box of Liberty fabric that my Mum shared with me. And, I've never looked back. I no longer hold back a pile of fabric on my shelf for later, for one day, for some future time when I'm finally "good enough". Right now, wonky seams and all, is good enough.
   photo DSC_0405.jpg

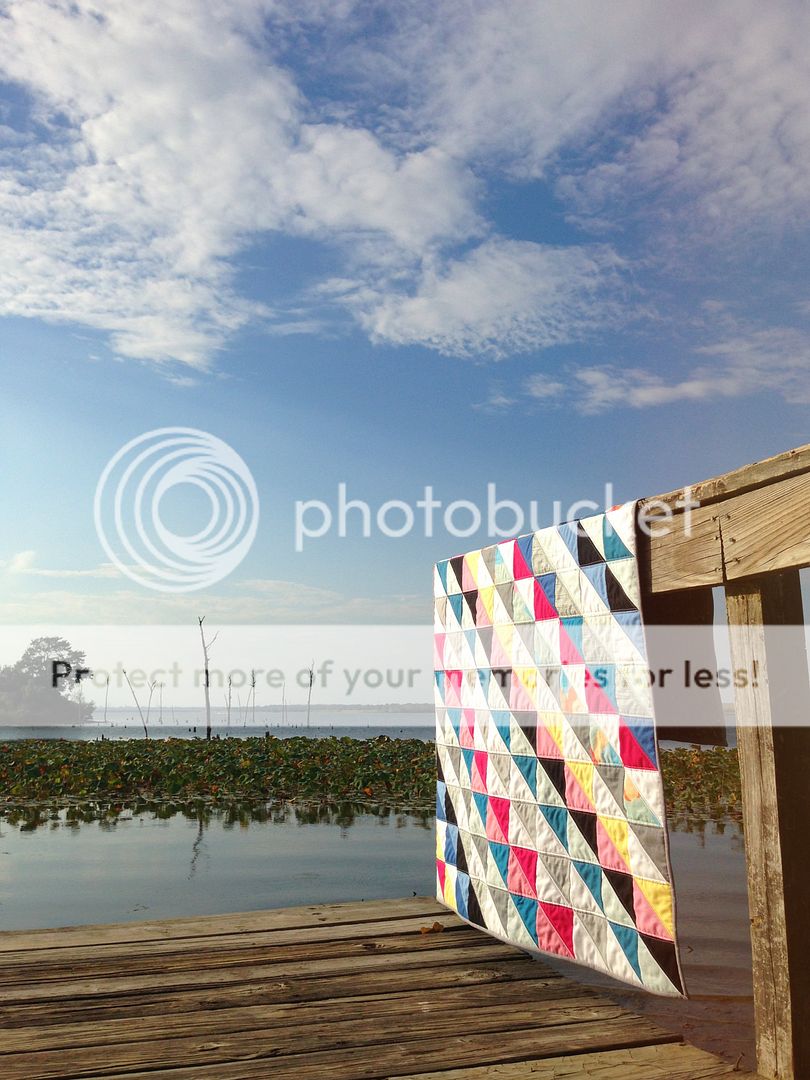
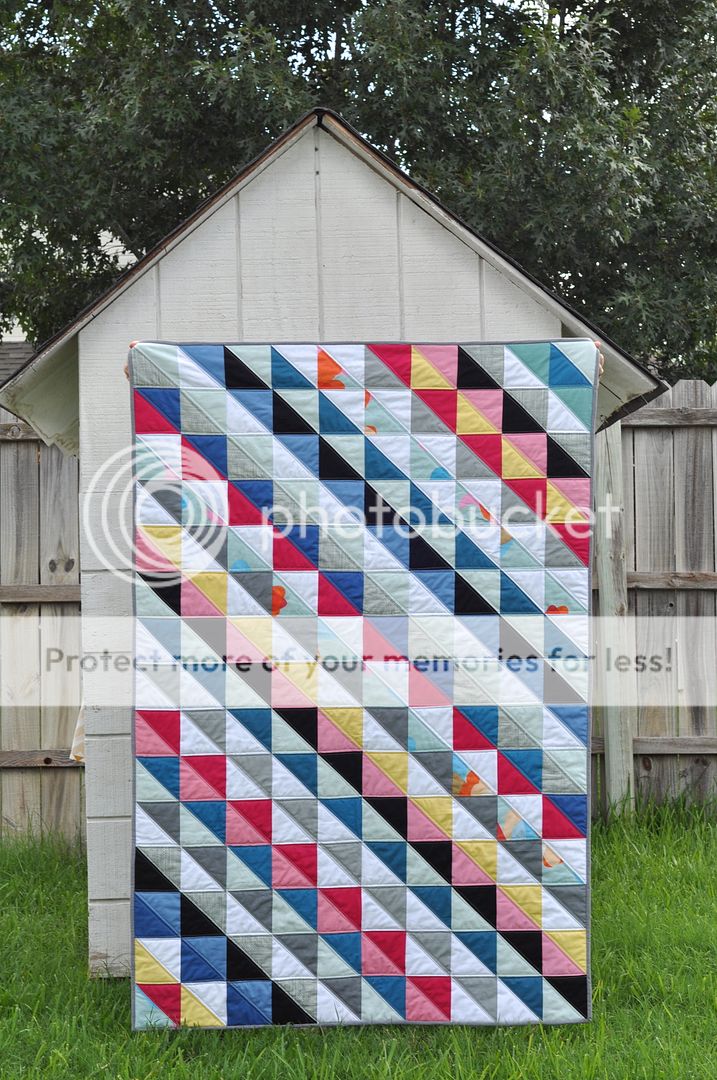
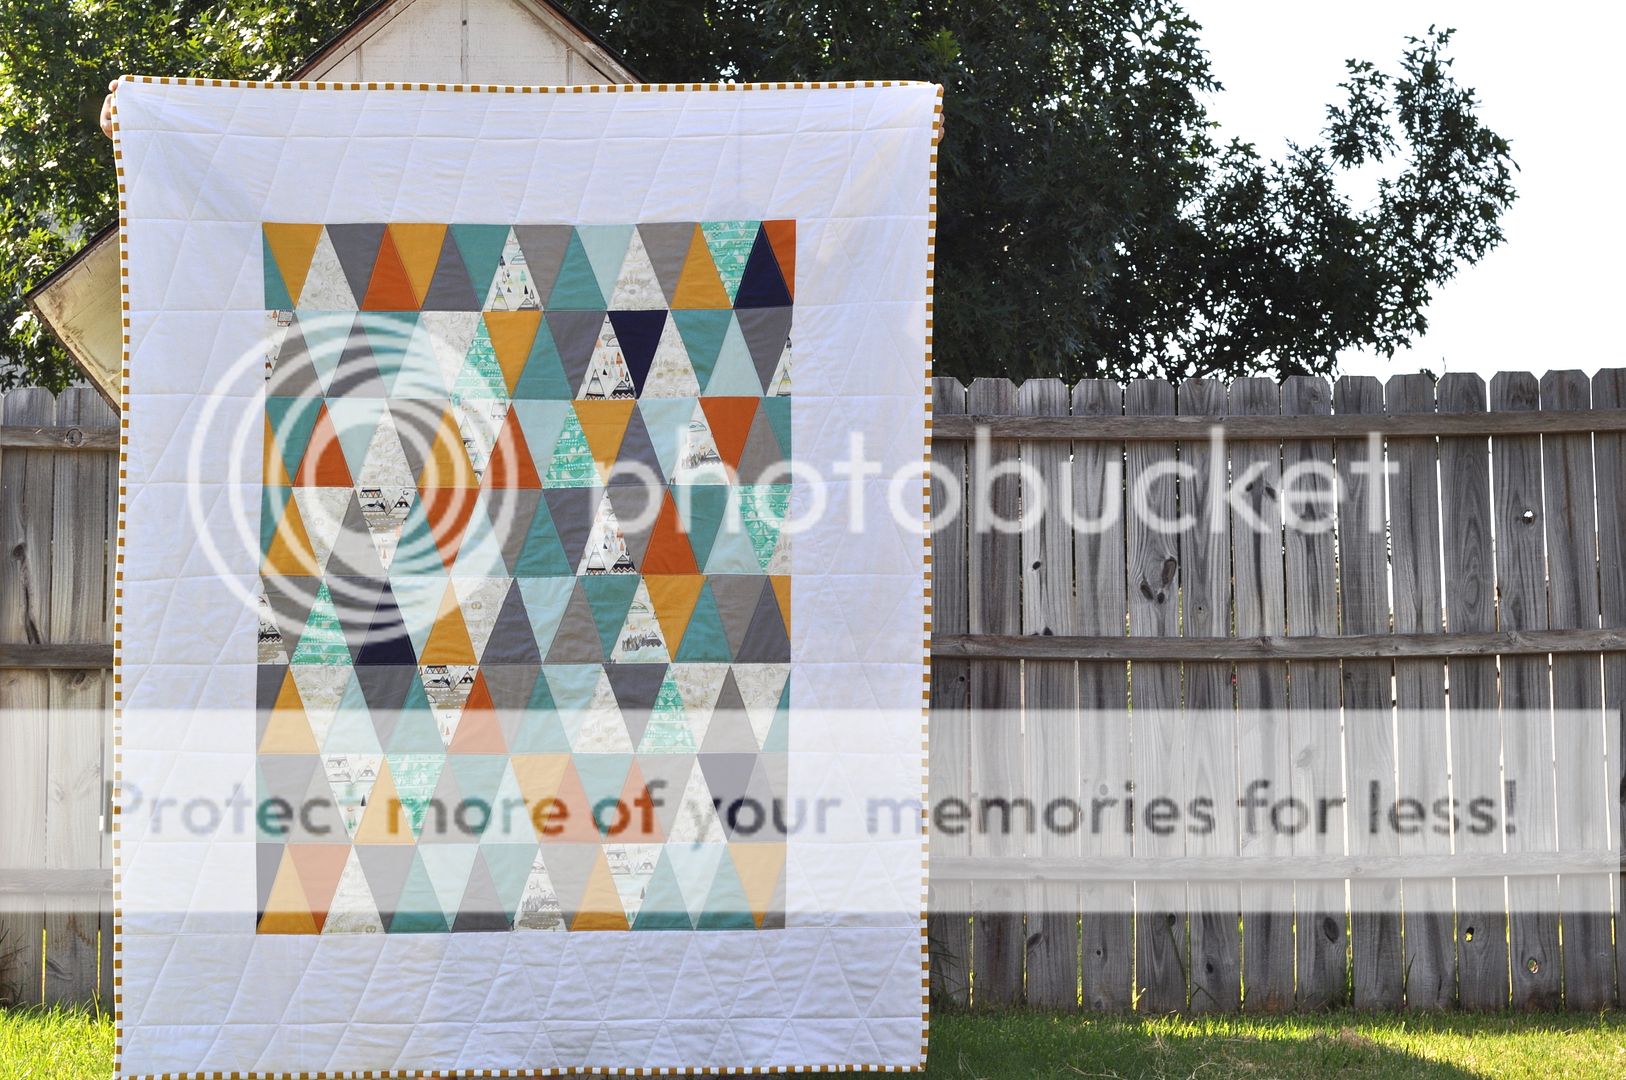
And what a pleasure it is to sew with beautiful, high-quality materials. This quilt, which I've named "Tea and Scones" in honour of the jam or cream-filled blocks, uses a selection of my favourite Liberty Lawn fabrics, in a pattern which is designed to use every last inch of a fat eighth cut. And I find that putting these prints together with solid fabrics is a lovely way not only to bring out the best in the Liberty prints, but also to put your own voice and style into the quilt with the hues and shades of the solids you choose.

So, throughout this pattern, while I have given the details and quantities of the fabrics I used, please feel free (or encouraged, even) to substitute in colours that speak to you. 

Ok, so grab your finest Liberty prints from the special place they are hoarded away, and let's get started!


 photo LibertyBlogHopButton.jpg
The Liberty fabrics for this post were provided by the "Give Me Liberty Club" -- a subscription service run by Westwood Acreswhich sends a beautiful selection of Liberty fabrics to members each month. 

Tea and Scones: Quilt Tutorial

Fabric Requirements:

5 fat-eighths of Liberty Lawn
1 yard white solid (Kona White)
1/2 yard pink solid (Kona Sangria)
1/4 yard grey solid (Essex Dyed Linen grey)
1/4 yard pale blue solid (Essex Dyed Linen blue)
1/4 yard turquoise solid (Essex Dyed Linen turquoise)
1/4 yard dark blue solid

 photo DSC_0396.jpg

Instructions:

1.
Cut your Liberty fabrics first. This pattern has been designed to use every single inch of a fat eighth cut of fabric, and so it is important how you make the cuts. First, lay the fat eighth strip out -- it will measure approximately 27" x 9 1/2". Measure 6 1/2" down from the top edge of the strip, and cut along the length of the fabric, so you have a strip that is 27" x 6 1/2". With the leftover, smaller strip, trim it to be 2 1/2" wide, so it measures 27" x 2 1/2".

Take the 6 1/2" wide strip of Liberty fabric, and cut it into 2 1/2" widths, all the way along -- this will give you ten strips.

Now take the 2 1/2" wide strip of Liberty, and cut 6 1/2" widths all the way down. These pieces will be the same size as those you have just cut (2 1/2" x 6 1/2"), but will have the pattern facing the opposite direction (horizontally as opposed to vertically) -- this will give you a further four strips, for a total of fourteen strips from each fat eighth of Liberty.

You should end up with 70 strips of Liberty fabric, each 2 1/2" x 6 1/2".

Note: In this quilt, I have used only 50 of the strips of Liberty fabric, and have given the exact quantities of each solid fabric used below. However, there is no need to use these quantities exactly -- this quilt pattern will work whatever ratio of prints to solids you choose to use.

 photo DSC_0323.jpg

2. Now cut your solid fabrics. You will need a total of 174 solid strips.

In this quilt, I used:

30 strips of Kona Sangria
84 strips of Kona White
14 strips of grey Essex Dyed Linen
25 strips of light blue Essex Dyed Linen
7 strips of turquoise Essex Dyed Linen
14 strips of navy solid

Note: You will use 192 of these strips (Liberty + solids) to construct your blocks, and the leftover 32 will be used later to create a border. 

You will also need to cut four squares 2 1/2" x 2 1/2" for the border corners, in any colour you like.

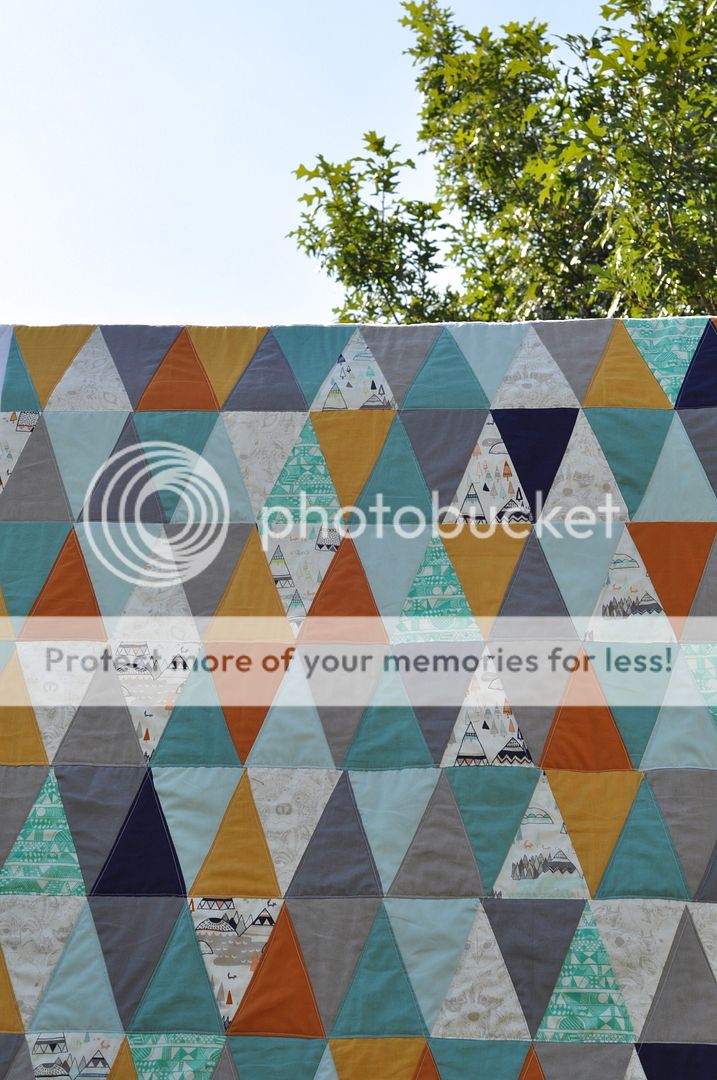
3. Now, begin to lay out your "scones" -- a pair of the same fabrics on either side of a contrasting fabric. The Liberty prints can go in the middle or on the outer edges of the block -- I found that making both styles of block created the look I wanted.

Let yourself be guided by colours you love together. Pick shades of solid fabric that enhance the colours in the Liberty prints you have chosen.

 photo DSC_0325.jpg

4. Assemble your "scones" by sewing the middle strip to one of the edge strips, (using 1/4" seam allowance), and then attaching the second edge strip to the other side of the middle strip. Iron all seams flat.

You will need to assemble 64 blocks to make this 51" x 51" quilt.

 photo DSC_0317.jpg  photo DSC_0328.jpg

5. Now, you can lay out your blocks, using a design wall or a larger empty floor space. The blocks are laid out in an alternating fashion -- the strips point vertically in the first, horizontally in the second, vertically in the third, and so on.

Hint: Place the most eye-catching, the brightest and darkest colours where you want them first, as these will create the movement and interest in your final quilt. Calmer and more neutral colours can then be filled in around them.

 photo DSC_0320.jpg

6. Once you are happy with the placement of your blocks, you can place the border strips around the edges. You will need 32 strips, plus four pieces 2 1/2" x 2 1/2" for the corners.

Tip: any off-cuts or cutting mistakes from your strip-cutting can be trimmed and used as the corners!

Place eight 2 1/2" x 6 1/2" strips along each edge. Their edges should line up with each block. You may want to use solid white strips to go alongside blocks with darker solids in them, and use contrasting colours in general on the borders so they compliment rather than confuse the design.

Place one 2 1/2" x 2 1/2" square in each corner.

 photo DSC_0332.jpg  photo DSC_0337.jpg

7. Sew the top and bottom border pieces together, each as a long row, beginning and ending with a corner square.

 photo DSC_0347.jpg

8. And then sew the quilt blocks together -- again, sewing each of them as a long row first, beginning and ending each row with a border strip.

 photo DSC_0346.jpg

9. Iron the seams open, and then sew your rows of blocks together, in order, to form your quilt top.
   photo DSC_0353-1.jpg

10. Back, baste and quilt your design. For this pattern, I love long, straight lines of quilting stitches, 1/2" apart, across the whole top.

 photo DSC_0397.jpg

Now, enjoy your quilt, preferably on a Spring day, with scones and tea!

 photo DSC_0367.jpg

 photo DSC_0384.jpg

For more ideas on how to put your lovely Liberty fabrics to use, pop over to the folks below over the next fortnight to see what they have created:

February 24th: Kick Off! Amanda at A Crafty Fox
February 25th: Astrid at Red, Red Completely Red
February 26th: Svetlana at Sotak Handmade
February 26th: Andy at A Bright Corner
February 27th: Chase at Quarter Inch Mark
March 1st: Emily at Simple Girl Simple Life
March 2nd: Ashley at Film In The Fridge
March 3rd: Lee at Freshly Pieced
March 4th: Audrie at Blue is Bleu
March 5th: Amanda at A Crafty Fox

Wednesday, October 22, 2014

fifty shades of fox

 photo IMG_7607.jpg  photo IMG_8145.jpg

In many ways, life at home with two little children revolves around the seasons. The spring is for picnics and planting; the summer, for dashing from one air-conditioned space to the pool and back again. This year, I loved sewing for these seasons: pastel quilts in April and May inspired by the lengthening sunsets; deep, rich quilts in July and August to remind me of what our garden gives us at that times of year.

And now, autumn is setting us free again -- the outside beckoning with new curiosities. I have not, once, though, sewn anything for the autumn -- until now.

I have to confess, I'm a little bit in love with orange this year in general -- it's been my secret weapon numerous times this year, in giving a bit of extra energy to the rather predictable turquoise-white-grey combo. And so, inspired by the (few) leaves that have begun to change in our garden, and the rather excessive family of pumpkins that have taken over our house, I chose a pattern that would fit an all-orange/red palette rather nicely...

FOXIES!

 photo DSC_0361.jpg  photo DSC_0353.jpg
 photo IMG_8464.jpg

These fancy fox faces are made using a pattern by Elizabeth Hartman (Fancy Fox Quilt, bought here). I don't think I can properly describe how much fun it is to turn little squares and rectangles into faces -- and, after the first one, how surprisingly easy! And addictive.

And so, the fox wall keeps growing, thoroughly freaking my husband out whenever he comes in -- as he says, "It's like walking into the woods on a foggy morning, and there's this pack of hungry eyes staring at you...".

I'll leave you with that thought, and these forty eyes, staring at you...

 photo DSC_0348.jpg

Tuesday, February 25, 2014

how to be a unique, one-of-a-kind creation


 photo DSC_0041-2.jpg

Something that has been weighing on me recently is the incredible commercialization of creativity -- the propaganda put out there that makes us feel that we need to use colour or pattern or designer fabrics in a certain way in order to make something beautiful. Having toyed with sponsorship last year, I've had my eyes opened to the business-side of this world, and the reality that lots of people receive all the new and trendy things for free, in return for selling them to the rest of us.

And while it can be a positive way to support small shops and designers, something about that role of advertiser makes me a little uncomfortable -- in general, but especially in the way that it affects how we express ourselves creatively.

I don't want to sell you "new and trendy".

I don't want to sell you the idea that you have to take one designer's fabric collection and plug it into another designer's pattern -- a sort of "paint-by-numbers" creativity. 

I don't want to sell you anything, other than the belief that you are a unique, one-of-a-kind creation, capable of creating beauty, and that you do not have to buy any specific product to make that true.

It's a real struggle for me to shake off that need to have whatever is new. I love buying fabric and love being inspired by what others are making. There's nothing wrong with either -- we all need to get our materials somewhere! When that translates to actual creating, though, I've started to ask myself, "Is this really me? Is this what I want to make, or an idea I'm being sold? Is it the compulsive-consumer in me who wants to do this, or the one-of-a-kind artist?"

 photo DSC_0038.jpg  photo DSC_0031-3.jpg

And with all that in mind, I've been sewing with scraps this week -- putting fabrics together that may or may not go -- and finding that this is where my heart really is. In this sea of blue scraps, it's the moments when the vintage flowers of Flea Market Fancy fall next to the modern graph paper of Architextures that make me smile.

Does it go? I'm not sure. Do I like it? Yes.

And I remember that, in this life, we do not have to fit into a box. We do not have to be a poster-child for minimalism or romanticism or for anything. We certainly do not need to be somebody else's billboard. We can simple love what we love, without worrying about being consistent, and see what happens.


Saturday, February 8, 2014

joy: a finished quilt

 photo DSC_00402.jpg

I love making things for other people, but this one... this one's for me.

 photo DSC_00422.jpg photo DSC_0051-1.jpg

In case you'd like to make your own, here are the instructions I followed for the blocks: 5.5" Economy Block Tutorial. Time consuming, but a lovely way to make the most of your most beloved fabrics.

 photo DSC_0096.jpg
 photo DSC_0079-1.jpg

Monday, September 30, 2013

wild geese

wild geese

wild geese

You do not have to be good.
You do not have to walk on your knees
for a hundred miles through the desert repenting.
You only have to let the soft animal of your body
love what it loves.
Tell me about despair, yours, and I will tell you mine.
Meanwhile the world goes on.
Meanwhile the sun and the clear pebbles of the rain
are moving across the landscapes, 
over the prairies and the deep trees, 
the mountains and the rivers.
Meanwhile the wild geese, high in the clean blue air, 
are heading home again.
Whoever you are, no matter how lonely, 
the world offers itself to your imagination, 
calls to you like the wild geese, harsh and exciting-
over and over announcing your place
in the family of things. 

--Mary Oliver


wild geese

This quilt was born from a passionate, all-consuming, full-bodied love of colour. In pairing each fabric up with a partner to form the basic half-square triangle blocks, I let the "soft animal of my body" (thanks, M.O.) decide. Instinct. Gut-reaction. A swelling of joy deep inside my rib-cage when the fabrics were just right.

All of the fabrics I cut were lovely, and yet, in pairing them up, some colours dulled each other, while others made their partner sing. I tried not to think about it, and just kept trying colours together until my heart said, "Yes! These two HAVE to be together."

No maybes.

wild geese

The quilt was inspired, originally, by an Amish layout, which called to me from the pages of a book like (you guessed it), "wild geese, harsh and exciting". I had planned to follow suit, using only solids in the Amish tradition, but when a half yard of Anna Maria Horner's "Ghost Wing" arrived in the post, it was just too perfect of a colour not to use -- that blend of minty green and turquoise that is so elusive. The pops of orange from the snippets of large-scale butterflies in the print give the quilt another dimension. I also added in a few rows of PB&J's "Picnic Raspberry Jam", which again, put a bit of a geometric spin on the Amish design.

I'm almost tempted to call this "Wild Geese I" right off the bat, as there is no doubt in my mind that I'll repeat this basic pattern with other flocks of other colours!


Saturday, August 17, 2013

a suffolk summer quilt

suffolk summer

We're just back from our summer holidays; this year, a month spent in Suffolk (on the east coast of England) with my family.

With the warmest English weather I can ever remember, we spent as many days as would could at the seaside, and then returned home to lay down blankets and sit in the garden together, looking out over the most amazing iridescent yellow fields. Something I've missed terribly since moving to Texas is a summer spent outside, and so the sea air and the evening breezes that swept up over the Waveney Valley gave me the deep, clear breaths I'd been missing.

suffolk summer
suffolk summer
suffolk summer
suffolk summer

We picked up a few souvenirs from this trip -- a handful of carefully chosen beach stones, two handmade mugs from my favourite gallery in Southwold, a few bars of Cadbury's -- but perhaps most meaningfully, my Mum and I worked together on a couple of quilt tops inspired by the local summer colours.

The mustard yellow fields. The chilly grey-and-navy sea. The pale warm sand. The bright pops of beach huts along the shore.

suffolk summersuffolk summer
suffolk summer

And what a lovely reminder it is proving to be. I'm still quilting it at the moment, but I've loved wrapping it around my shoulders even now -- loose ends, safety pins and all -- while looking through photos from the trip.

suffolk summer suffolk summer
suffolk summer

More than other other quilt, this one is infused with a sense of calm and well-being; the feeling of rest, of being home and really known. Something unexplainable that comes, perhaps, from the sharing of fabrics and time and this period of life spent together.


Wednesday, July 17, 2013

an accidentally enormous barn-raising

While working with on the last quilt, I couldn't help but fall in love with the Indian Summer prints. Those little foxies! The mountains! The mushrooms and feathers!

Perhaps the hardest thing about sewing something for someone else is that, of course, you have to give the quilt to them when it's finished.

So, in an attempt to make the parting easier, I knew I had to sew something else with the strips and scraps (and other prints from the collection).

barn raising

In fact, I'd planned to use a lot more prints in the design, but found that a large helping of solids produced the graphic effect I was hoping for. In fact, I'd planned to use so few solids that I began with only one fat quarter of navy -- I was soon back for more, but the original blue I'd used was no longer in stock. And so, knowing that the blues wouldn't all match anyway, I brought home two new shades of navy -- which is now, of course, one of my favourite parts of this quilt; the depth created by several tones of the same colour.

And, in similar "oops!-oh-well-I-like-it fashion", the blocks ended up almost doubly as big as I'd planned -- a whopping 17" instead of 10". This design uses log-cabin blocks in a traditional layout know as a "Barn Raising". Barn Raising quilts often have many concentric diamonds of alternating colours, but here, thanks to the giagantic blocks, the design is enlarged so that two complete diamonds are enough for an entire quilt.  These quilts, they seem to prefer to design themselves!

barn raising

I've folded it and put this one aside for now, to be tackled after our summer hols, when perhaps I'll have a better idea how to squeeze all this fabric through the tiny little neck of my poor old sewing machine!

Saturday, July 13, 2013

summer's light: a finished quilt

arlo's quilt 
When I look at this quilt, finished, I can see the bright morning light of July streaming through a (stained-glass) window. A new light, a new life. Warmth, summer, hope.

Somehow, this configuration of triangles, designed simply by putting together fabrics that "felt right" next to each other, seems to have a prismatic effect -- white light, refracted, splitting, bouncing around inside the borders.

arlo's quilt arlo's quilt arlo's quilt

The design -- bright solid triangles, limited prints, large white border -- is inspired by a quilt made by Joy of Wildflowers Photography, but featuring a palette that might sit better in a little boy's nursery. As I wrote about earlier, this was a collaborative project. My friend never having made a quilt before, and myself having never sewn a triangle before, we were both extremely surprised by how simply the whole thing seemed to come together. One row at at time, and the points somewhat magically came out pointy!

All of the prints used are from Art Gallery Fabric's Indian Summer collection -- perhaps my favourite collection of the year so far (I got a fat quarter bundle from WestWoodAcres -- they don't seem to have the bundle in stock currently, but do have yardage of the foxy mountains). For this quilt (as it is heavily bulked-up with Kona solids), I used only four fat quarters, and even had plenty of scraps left over from those to carry into the next project!

arlo's quilt
arlo's quilt

Pure joy -- the working together, the Southwestern-style colours, the triangles. I have big plans for the rest of the Indian Summer line, and will definitely be having another go at triangles as soon as possible. One for my faithful little assistant, perhaps?

arlo's quilt