Showing posts with label fabric. Show all posts

Saturday, December 10, 2011

{a community quilt}

Last night, as the clock struck twelve, the last of the tea was drunk, the final ginger-chocolate-chip biscuit was scoffed, and the 130th square was slipped into place on my living-room floor. The enormous grey and yellow geometric pattern is a first effort at community quilting -- quilts made with donated fabric, by volunteers, for local people in need of bedding. 

You can read more about the project, and get involved, here.


P.S. Anyone else imagining a bumblebee? You know, the modern sort of bee, who's strictly about organic honey, wears waistcoats, and comes home to a minimal, Scandivanian-style hive? 

Wednesday, November 9, 2011

{outlook: cloudy}

Where I grew up, it was cloudy 364 days of the year. Grey clouds, black clouds, it's-about-to-rain, oh-wait-it-is-raining clouds. Even on sunny days, there were wispy white clouds, which often produced rain by the afternoon. But Texas is almost cloudless. There are a few days of ominous monsoon thunder clouds, and then the blue sky is wiped clean.

All that to say, I'm a bit cloud crazy at the moment. Whether it's missing the familiar clouds of England, or just feeling the need for soft fluffy things to lounge around with, I'm loving the way something wet and drizzly can become bright and beautiful. 


Monday, August 29, 2011

{for the love of burlap -- with m'lynn}

Here we are again with the last in our series of guest posts. Today, we're welcoming M'Lynn of The Creative Cup, who also writes a beautiful and thoughtful blog here. She has put together a
burlap wreath, made all the more perfect by the red flowers! Inspired? Yes, me too...

Burlap is my go to medium for most all of my home decor projects. I'm head-over-heels in love with this fabric because it is so inexpensive, it has wonderful texture & colors, and it helps fill my home with a rustic-country flare that suites our decor and agriculture lifestyle. My latest burlap project just happened to have a little touch of red to fit with Astrid's love of the color. Inspired by the wonderful wreaths I found and pinned on my Pinterest board HERE, I made this scrappy burlap (with red) wreath to welcome guests into our home.


I used exactly one yard of burlap, a heavy duty wire wreath frame, and fabric scraps left over from previous projects. No sewing was required, just knotting, tying, pinning, gluing, and twisting.
 
May this burlap (with red) wreath be a pleasant way of welcoming our friends and family into our burlap-filled home.

Thanks, M'Lynn. A lovely choice of colours, and what a brilliant way to use burlap! Thanks, again, to all our guest bloggers -- I'm on my way to England tomorrow, where we'll have Internet access, and we'll have some photos of Denmark up to show you very soon!

Sunday, August 7, 2011

{beside the seaside}

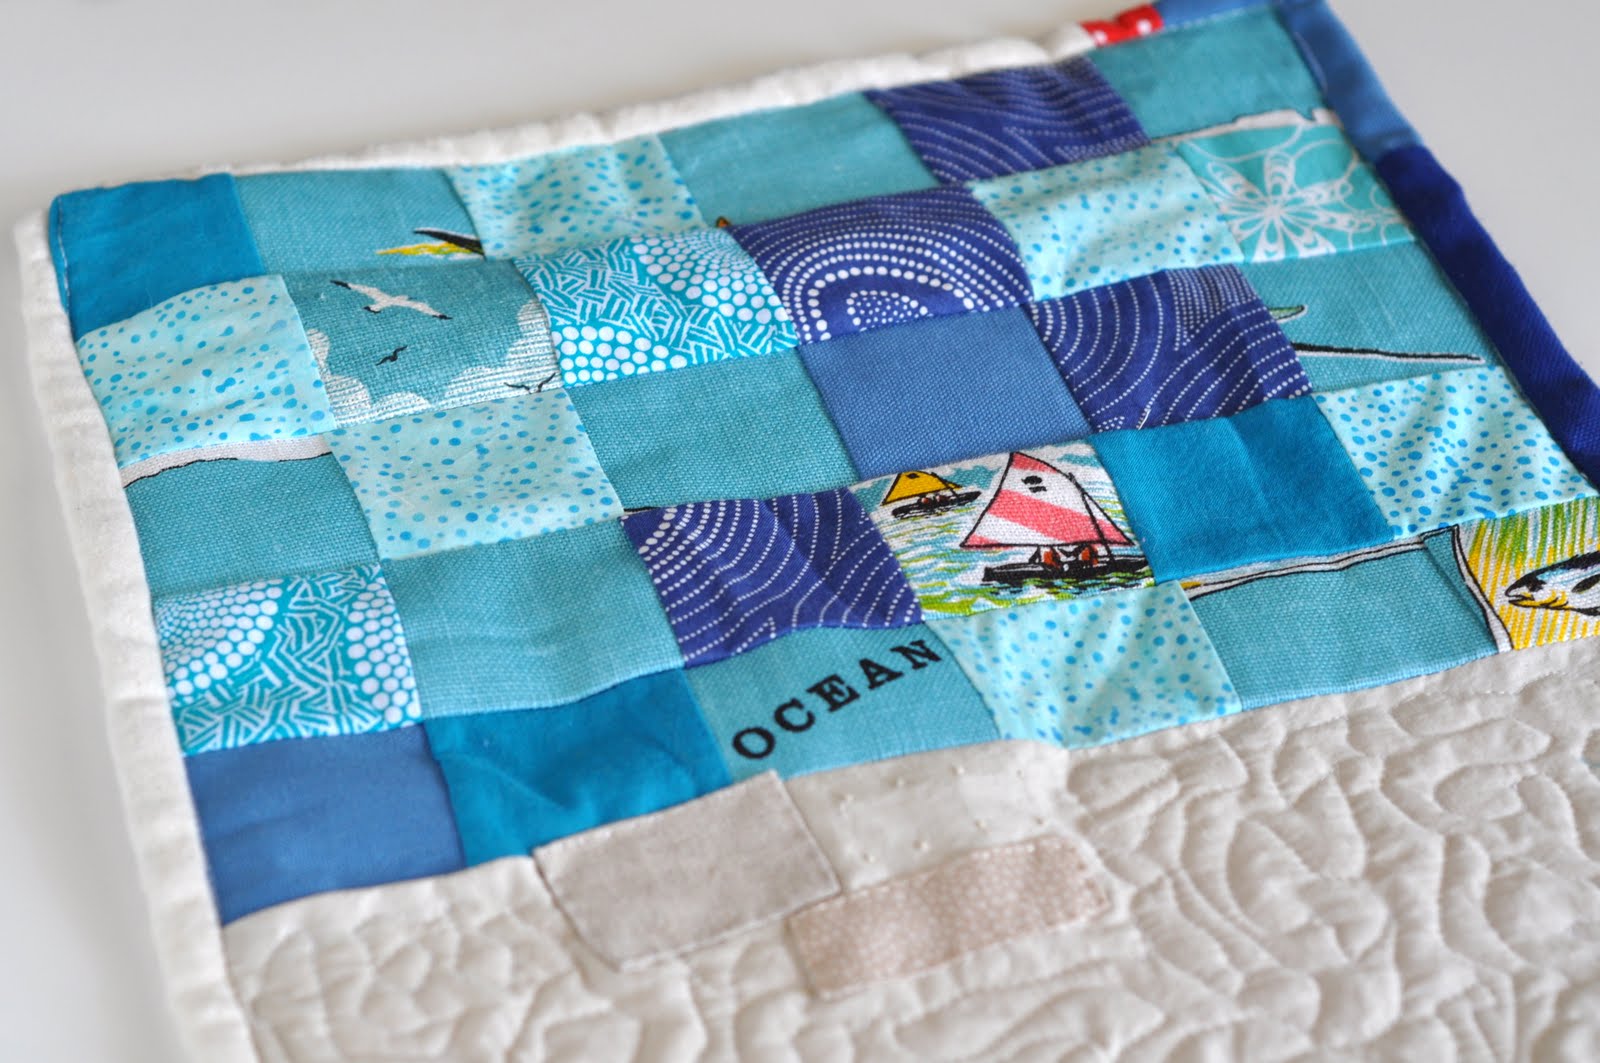
You might remember getting a few close-up glimpses of patchwork a few weeks ago? The mini quilt was made as a housewarming present for my parents, who recently moved back to England after nine years in China. As I was able to deliver it to them earlier this week, I can now show you the whole thing, without spoiling the surprise!


Their new home is just a short drive from Southwold, a little seaside town with rows of brightly-coloured beach houses along the shore -- and that was the inspiration for this quilt. Three little linen beach houses sit along the striped promenade, looking out to sea.


The sea, as I might have mentioned, is a patchwork of squares cut from the vintage linen tea towels that Justin's grandma gave me, mixed with other cotton prints (including one that became Tilly's second homemade dress!) After a little mix-up with the pinning, my carefully-planned order of squares ended up totally random -- but luckily the bird still ended up above the boat, and the boat above the fish, so there was some semblance of logic. 


At present, it serves as more of a mini runner or mat, but I sewed up two loops in one of the fabrics, so that it can hang at some point -- possibly from a nice piece of driftwood found on the beach!


I was also able to give Alice the giant knitted blanket I made back in March, which will accompany her to university this autumn. Ever the fashionista, she found she could wind it around her neck as the world's chunkiest scarf. It's lovely to know that it'll be keeping her warm, at home or on the town!

Monday, July 18, 2011

{from my heart to yours: a tutorial}


Thanks so much to all of you who shared kind words, compassion, and your own stories with me last week. I don't think my inbox has ever been so full of strength and community. Thank you. Welcome, too, to new readers stopping by from CraftGossip and Ladies in Waiting -- it's been a pleasure connecting with you all.


We love to look out of the window, see the bright hearts, and be reminded of Mormor. I like to imagine her looking down from her cloud, scanning Texas, and the hearts catching her eye and showing her where to find us. As the little hearts we hung on our tree seemed to resonate with so many people, I'm going to show you, quickly, how to make them. 


Materials: 
a scrap of fabric, approximately 10" square
stuffing
needle and thread
paper
6" piece of ribbon
sewing machine (optional)


Begin by drawing a heart template on to paper. I find that I usually draw too small, and almost always go around the original adding a 1/4" extra. Cut out your template, and use it to cut two hearts out of your chosen fabric.


Cut a small square, with edges of approximately 2", out of the fabric. This will be your pocket for the front.


Fold the edges of the pocket 1/4" to the wrong side. Iron them to hold the fold.


Sew along the top edge of the pocket (I prefer hand-stitching, but you can use a sewing machine for all of this, if you like). If you want to decorate your pocket, by adding buttons or embroidery, do that now.


Place the pocket in the centre of one of your hearts, both right sides facing up. Pin in place, and sew around the three remaining sides, attaching the pocket to the heart.


Stack the two hearts together, right sides together, so that the pocket is sandwiched in the middle. Place your ribbon between the hearts, so that it forms a loop, with the ends sticking out at the top. 


Sew around the edges, leaving a 3" gap for turning.


Turn your heart inside out, and fill with stuffing. Sew up the gap.


To add messages, we simply cut thin strips of paper, 1" wide and 6" long. For us, what seemed best was writing down the things we would have like to be able to say to Mormor. You could also fill you hearts with favourite memories, prayers, quotations, small instant photographs, favourite sweets or flowers.


Thanks again for sharing your lives with me over the week. For those of you who will be creating your own tree of hearts, I hope it brings you comfort and peace. xx

Monday, July 4, 2011

{red red mystery packet}

As a big thank-you to you all for putting up with my complete birthday obsession for the past few months, I've got a little surprise. I've put together a packet of all things red, and it's all ready to send out to one of you!


There's redness for everyone -- red for sewing, red for cooking, red for tea-lovers and red for the organised. No doubt, I'll rustle up a few more red things, too, before the week is out.


And all you need to do is leave me a comment below. If you can't think of anything to say, just write 'red' and I'll be happy. There are no rules. Open to friends, family, people who googled "I'm sunburnt completely red" and ended up here by accident -- this means you. Go on, don't be shy...

I'll pick a winner on Monday 11th July, so stop back then!

Tuesday, June 21, 2011

{matchy matchy}

Inspired by all the memory games I showed you the other day, I made this little animal matching game for Tilly. It's sort of cheating -- rather than make the whole thing myself, I simply made a board to go with a Clothkits Noah's Ark that I used to play with as a child.

What a relief to not have to make new animals! And it's sort of lovely to turn one toy into two toys. 

Maybe you've got a similar set of animals that could double as game pieces? Or, it could be fun to use household objects and have more of a scavenger hunt game -- make a game board that has spots for a fork, a hairbrush, a banana, the TV remote!


To make it was simply a case of drawing around each animal onto fabric (I used fabrics that roughly matched the colour of the animal, to make matching a little easier), cutting them out and sewing them onto a square of white linen.

Then, to increase the future educational value, I added freezer-paper-stenciled animal names.


Here's the board:


And here it is with all the animals in place:


Yes, there was quite a discussion about how to say 'zebra'. We're going to have one poor little confused baby when it comes to the letter 'z'.


The sheep seems to be Tilly's favourite. I wonder if all those grey fluff lines remind her of the sheepskin she can't sleep without.


The crocodile is Bella's favourite -- I always seem to be pulling him out from her jaws. Luckily, tooth marks only seem to give him more character.


Tilly was very excited by the whole thing...

...for a few seconds. And then off she went to tip over the furniture, empty cupboards, and rip magazines apart. 

How lovely that putting the game away is as simple as loading the animals back onto the ark.


I've got a feeling this'll be perfect if we ever have forty days of rain.

Friday, June 17, 2011

{a&j}

Again with the monograms. Honestly, before this month there was nothing around here emblazoned with letters. But here we go again -- the American Typewriter taking over -- this time with fabric paint.


I sewed up the red fleece ampersand a few months ago. It turns out it's Justin's favourite thing. He likes to throw it. He likes to put it on his head like a pretzel hat.

And, while it lived on the sofa, awaiting completion of the stenciled pillows, it was quite a talking point. As in, anyone we had over would ask what it was. Followed by, "And why did you make a red stuffed ampersand?" Um, no reason. To see if I could.


Anyway, I just spotted this amazing tailored ampersand over at The Marion House Book, and am totally itching to make another. 


In fact, it's a whole tweed and plaid tailored alphabet. And don't I need a tweed and plaid tailored alphabet for teaching Tilly to read? (Yes is the answer. Yes, I do!)

P.S. The felt and linen quote from "Deep in the Heart of Texas" hanging in our bedroom was the first thing I made after we had Tilly. What a long time ago that seems now!

Saturday, June 11, 2011

{inspiration: memory games}

There are some gorgeous designs for memory games around at the moment, from big bright animal versions for little children to personalised photo versions that serve as a fun way to look back at years past. Felt, cotton, wooden blocks, fancy Liberty prints... there's a medium for everyone. 

This beautiful game by Treefall Designs will help baby to recognise shapes, animals, and colours.


Lily's game at Block-a-day, using blocks affixed with favourite family photos, is a special way to celebrate shared moments. And we have no shortage of photographs around here...


The Student Teacher strikes again with this colourful game, made from wool felt and squares of patterned fabric. Plus, it's chewable, so would last more than five minutes in our house.


Moolka has a sweet wooden set to buy, which could easily be reproduced with wooden tiles and a bit of paint.
No Big Dill has another way to use your family photos in the game -- printing them onto transfer paper and ironing them onto fabric blocks.


And a sweet, simpler version from Just Enough Style (via Naptime Crafters), with clear shapes and bright colours for little minds. This one could be whipped up in a single afternoon, I bet.


Decisions, decisions. I'm not putting any pressure on myself to have a game of our own ready for Tilly's birthday (seriously, how many hand-sewn presents does one baby need?) but am letting the possibilities fester for a little while before jumping in.

Which one strikes your fancy?

Sunday, June 5, 2011

{a stack of 2x4s}


What, did you think I was working with wooden planks?

No, these little 2x4" strips of fabric are all set to be sewn up into my latest wacky idea. Let's just say patchwork binding. Small scraps, giant project. I'm excited. And a little bit insane.

I'm blaming the growth chart I'm making for putting me in the mood for incredibly long lines of fiddly little patchwork. It's really putting my patience to the test and making me super fast at running between sewing machine and ironing board. Watch this space for the results...

Friday, June 3, 2011

{to top it off}

In my search for ideas for birthday crowns, I came across these beauties. Each one seems so full of personality -- just like the birthday boys and girls, I'm sure. 

This fabric crown, by Cupcakes for Clara, was made for another little Matilda! The flowery prints are lovely, and I really like the font of the embroidered 'm'. Typewriter meets thread -- I love it.


This felt crown, by Floating World, has that great border around the bottom. I've got a bit of Russian Doll twill tape that might do the same job perfectly. Plus, I love any excuse to practice the chain stitch my Mum taught me last Christmas!


And this sweet little crown by Chasing Cheerios is a lovely way to show the age -- with a single candle on the cupcake. And it would be very simple, the next year, to stitch on a second candle to continue the tradition.


Tilly's crown was inspired by all three -- a felt section in the middle, but with fabric sides (which, incidentally, match her party dress, so this year she'll be a super coordinated little birthday girl).


I usually stay away from using initials, because I can never decide whether to use an 'M' for Matilda or a 'T' for Tilly. But I loved the other Matilda's crown so much, I couldn't resist adding a letter, and a typewriter's 'm' looks much better than a 't' in the same font. So, it was decided -- she'll be Matilda for birthdays.


Tilly tried it on, just a minute ago, so I could check it fits, and was so excited to wear it. Usually, when I put any sort of hat on her, she grabs madly at her head until the offending article until either it comes loose or until it gets stuck over her eyes and I take pity on her, but amazingly the crown was left untouched! Let's see if she can leave it in place when it comes time for birthday photos...